Difference between revisions of "Managing Job"
(Created page with "A job in Polaris CFD is a simulation defined by the project file. Users can submit a job to start running on a cluster or local workstation. =Submit a job= =Monitoring a job=") |
|||
| (11 intermediate revisions by the same user not shown) | |||
| Line 1: | Line 1: | ||
A job in Polaris CFD is a simulation defined by the project file. Users can submit a job to start running on a cluster or local workstation. | A job in Polaris CFD is a simulation defined by the project file. Users can submit a job to start running on a cluster or local workstation. | ||
| − | = | + | =Submitting a job= |
| + | After a project has been setup, its simulation can be submitted from the viewer. Click on the "Job Monitor" button to open "Job Monitor" dialog. | ||
| + | [[File:Job_Monitor_0.png|caption|600px]] | ||
| − | =Monitoring a job= | + | ==Specifying solver options== |
| + | A few job options can be specified at run time. Each of these options is special and can affect the simulation result in certain ways. | ||
| + | |||
| + | Options related to solver licenses (note that solver license is different from viewer license) | ||
| + | :-query_lic_server | ||
| + | ::query license information, such as license expiration date and how many licenses are available | ||
| + | :-list_lic_usage | ||
| + | ::shows the licenses been used by all running simulations | ||
| + | :-release_all_lics | ||
| + | ::releases all the solver licenses held up by this client computer. This option is useful when previous job was terminated abnormally without releasing the licenses. Note that client compute cannot ask the license server to release solver licenses held up by other computers. License server's administrator can perform such a task. | ||
| + | |||
| + | Options related to MPI | ||
| + | :-np <N> | ||
| + | ::run the simulation with N processes | ||
| + | :-hostfile <hostfile> | ||
| + | ::specify a hostfile/machine file for MPI. A sample hostfile is provided in the "res" folder. Refer to MPI specification for explanations. | ||
| + | |||
| + | Options related to simulation | ||
| + | :-exact_resolution | ||
| + | ::grid cell size will equal to the user defined value exactly. When this option is given discretization may be less robust. This option is useful for some validation cases. | ||
| + | :-no_shared_mem | ||
| + | ::effective for linux only. Shared memory will be turned off. More memory consumption is expected. This option is useful when some linux OS or hardware causes simulation with shared memory to crash. | ||
| + | :-user_routine <lib> | ||
| + | ::supply a shared lib with user subroutines to modify the simulation for user specific analysis. Please refer to "User Subroutine" for details about how to create user subroutines and shared libraries. | ||
| + | :-no_stepping | ||
| + | ::run discretization only. Solver quits immediately after discretization without time stepping. | ||
| + | :-help | ||
| + | ::how to run the solver | ||
| + | |||
| + | ==From "Job Monitor" dialog== | ||
| + | User can enter solver options, if it's necessary, specify number of MPI processes and/or the hostfile, then click on "Submit Job". Screen output from the solver will be shown in the text area. | ||
| + | |||
| + | ==From command line== | ||
| + | It is strongly advised that user enters the project folder first. Then issue the command below to start a simulation. | ||
| + | :command for linux | ||
| + | :: polaris_solver.sh [-np <N>] project.aries >& screen.out | ||
| + | :command for windows | ||
| + | :: polaris_solver.bat [-np <N>] project.aries > screen.out | ||
| + | |||
| + | A file "screen.out" will be generated immediately after the command is issued. User can use any text editor to check the status of the simulation. | ||
| + | |||
| + | =Monitoring job status= | ||
| + | For each simulation it is important to monitor the simulation for stability, efficiency, convergence and accuracy. It is sometimes necessary to kill a job after a few steps of simulation, to make adjustments to the geometry, VR or other parameters. | ||
| + | |||
| + | ==Screen output== | ||
| + | Screen output first reports the solver version and license server information. Then it echos the project setup and definitions. Later it reports the summary of discretization. Time stepping follows. Messages related to adaptive mesh refinement and moving geometry will be reported when they occur. | ||
| + | |||
| + | ==Monitoring force history== | ||
| + | |||
| + | [[File:Job_monitor.png|thumb|200px]] | ||
| + | |||
| + | Force history often is a good indication for convergence. When the job is running, from the "Job Monitor" dialog, click on "Show graph" and open the file "project_force.csv". | ||
| + | |||
| + | The graph will automatically update when data is available. The horizontal axis is "Time", the physical time simulation has reached. On the right side is a list of variables available for plot. "Time", "Force:X", "Force:Y" and "Torque:Z" are always in the force history file. Other components are available if they were requested and/or the simulation is a 3D analysis. | ||
| + | |||
| + | User can right click in the graph area and select "Set axis range" in the popup menu. The range of each axis can be specified. Default range is automatically computed to cover the min and max values. | ||
| + | |||
| + | =Killing a job= | ||
| + | If a simulation is submitted from the viewer, click on the "Kill Job" button. On any platform users may have to kill the solver process manually. | ||
| + | |||
| + | =Restarting a job= | ||
| + | Parameters related to restart are defined in the project setup. User just need to resubmit the job after setting restart parameters in project setup. It's an good idea to pipe screen output into a different file. | ||
| + | |||
| + | [[Category:Jobs]] | ||
Latest revision as of 19:55, 20 May 2015
A job in Polaris CFD is a simulation defined by the project file. Users can submit a job to start running on a cluster or local workstation.
Contents
Submitting a job
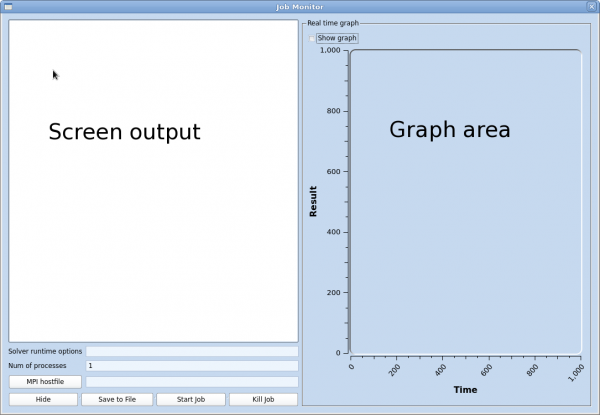
After a project has been setup, its simulation can be submitted from the viewer. Click on the "Job Monitor" button to open "Job Monitor" dialog.
Specifying solver options
A few job options can be specified at run time. Each of these options is special and can affect the simulation result in certain ways.
Options related to solver licenses (note that solver license is different from viewer license)
- -query_lic_server
- query license information, such as license expiration date and how many licenses are available
- -list_lic_usage
- shows the licenses been used by all running simulations
- -release_all_lics
- releases all the solver licenses held up by this client computer. This option is useful when previous job was terminated abnormally without releasing the licenses. Note that client compute cannot ask the license server to release solver licenses held up by other computers. License server's administrator can perform such a task.
Options related to MPI
- -np <N>
- run the simulation with N processes
- -hostfile <hostfile>
- specify a hostfile/machine file for MPI. A sample hostfile is provided in the "res" folder. Refer to MPI specification for explanations.
Options related to simulation
- -exact_resolution
- grid cell size will equal to the user defined value exactly. When this option is given discretization may be less robust. This option is useful for some validation cases.
- -no_shared_mem
- effective for linux only. Shared memory will be turned off. More memory consumption is expected. This option is useful when some linux OS or hardware causes simulation with shared memory to crash.
- -user_routine <lib>
- supply a shared lib with user subroutines to modify the simulation for user specific analysis. Please refer to "User Subroutine" for details about how to create user subroutines and shared libraries.
- -no_stepping
- run discretization only. Solver quits immediately after discretization without time stepping.
- -help
- how to run the solver
From "Job Monitor" dialog
User can enter solver options, if it's necessary, specify number of MPI processes and/or the hostfile, then click on "Submit Job". Screen output from the solver will be shown in the text area.
From command line
It is strongly advised that user enters the project folder first. Then issue the command below to start a simulation.
- command for linux
- polaris_solver.sh [-np <N>] project.aries >& screen.out
- command for windows
- polaris_solver.bat [-np <N>] project.aries > screen.out
A file "screen.out" will be generated immediately after the command is issued. User can use any text editor to check the status of the simulation.
Monitoring job status
For each simulation it is important to monitor the simulation for stability, efficiency, convergence and accuracy. It is sometimes necessary to kill a job after a few steps of simulation, to make adjustments to the geometry, VR or other parameters.
Screen output
Screen output first reports the solver version and license server information. Then it echos the project setup and definitions. Later it reports the summary of discretization. Time stepping follows. Messages related to adaptive mesh refinement and moving geometry will be reported when they occur.
Monitoring force history
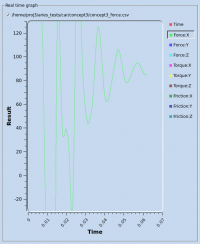
Force history often is a good indication for convergence. When the job is running, from the "Job Monitor" dialog, click on "Show graph" and open the file "project_force.csv".
The graph will automatically update when data is available. The horizontal axis is "Time", the physical time simulation has reached. On the right side is a list of variables available for plot. "Time", "Force:X", "Force:Y" and "Torque:Z" are always in the force history file. Other components are available if they were requested and/or the simulation is a 3D analysis.
User can right click in the graph area and select "Set axis range" in the popup menu. The range of each axis can be specified. Default range is automatically computed to cover the min and max values.
Killing a job
If a simulation is submitted from the viewer, click on the "Kill Job" button. On any platform users may have to kill the solver process manually.
Restarting a job
Parameters related to restart are defined in the project setup. User just need to resubmit the job after setting restart parameters in project setup. It's an good idea to pipe screen output into a different file.

